Scope/Description
- This guide runs through in detail what lifecycle management is, how to deploy it, and how to create custom storage classes with RGW’s.
Prerequisites
- This guide assumes you have a Ceph cluster deployed with 2 RGW’s in place and the required RGW pools created such as buckets.data, buckets.index, buckets.non-ec, rgw.log rgw.meta.
- If this is not the case, refer to the 45Drives Ceph ansible guide to deploy your RGW’s or the official Ceph docs.
Steps
- This guide will detail how we can move objects to different classes of storage in order to separate them based on time. For example, we can dictate that any object older than N number of days be moved to a storage class called “cold”. Instead of moving to a separate storage class, the objects can instead be set to expire after a period of time, which will then be sent to Ceph garbage collection for deletion.
- Rather than deleting, the secondary storage class could be tied to a pool with a much more aggressive erasure coding pool that gives much better storage efficiency, but may not be quite as redundant. This could be a good tradeoff for files that are no longer deemed necessary for production, but still want to keep a copy rather than deleting outright.
Creation of new storage class and pool
Note: If you only wish to create a rule that expires and deletes objects, rather than moving them to a new storage tier, this section can be skipped, and you can move directly to “Creating S3 lifecycle management policies”
- This guide assumes the default RGW configuration. If you have a custom zonegroup or zones and placement targets set up you will have to replace the default names for your configured names.
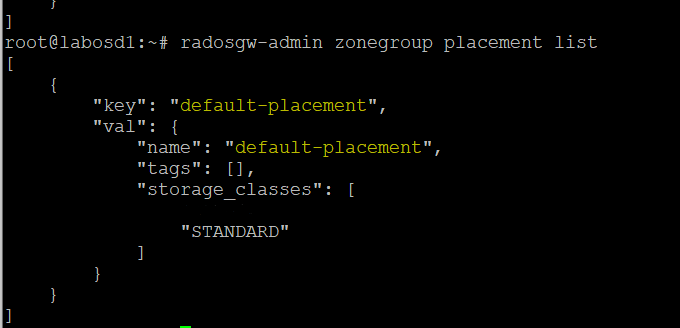
- To find out if you are using the default configuration, run the following commands:
root@labosd1:~# radosgw-admin zonegroup list

root@labosd1:~# radosgw-admin zone list

root@labosd1:~# radosgw-admin zonegroup placement list
- For a default configuration, it will look like this:
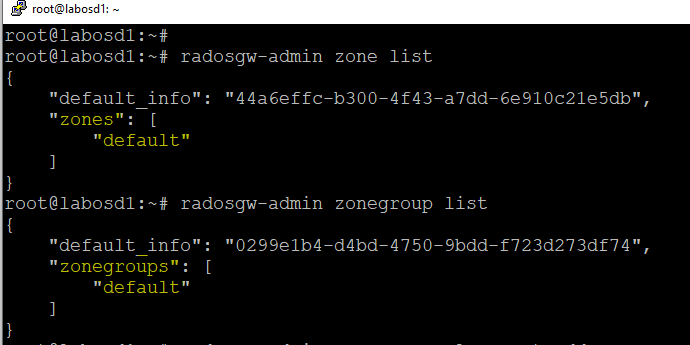
- If the output is different, be sure to replace “default” and “default-placement” with the correct naming scheme in the guide that follows.
Add a new storage class
- First, create a new storage class within the Ceph RGW structure so a new pool can be created and then assign that pool to the new class. This guide is going to use the name “COLD” for its storage class. You may want to instead use a storage class that AWS uses. They have predefined storage classes such as 1A-Standard. you Can find them here
root@labosd1:~# radosgw-admin zonegroup placement add \

--rgw-zonegroup default \

--placement-id default-placement \

--storage-class COLD

- Next, provide the zone placement info for the storage class that was just created. Also, set the name of the pool that the storage class “COLD” is going to be tied to. The pool does not have to be created yet. It can be done in the next step.
root@labosd1:~# radosgw-admin zone placement add \

--rgw-zone default \

--placement-id default-placement \

--storage-class COLD \

--data-pool default.rgw.cold.data \

--compression lz4
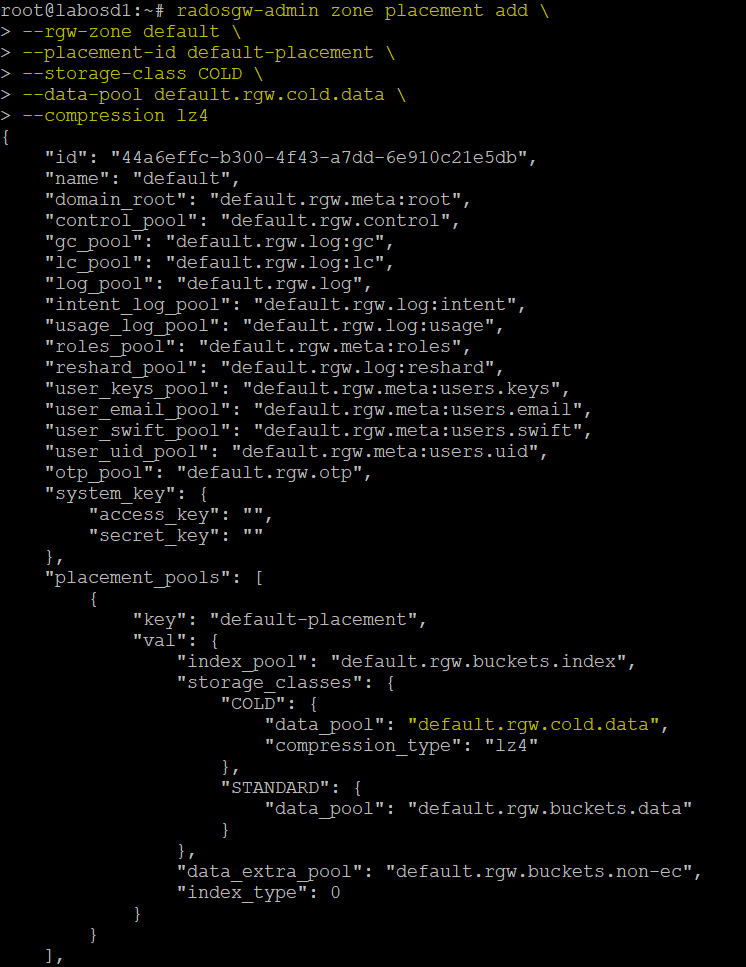
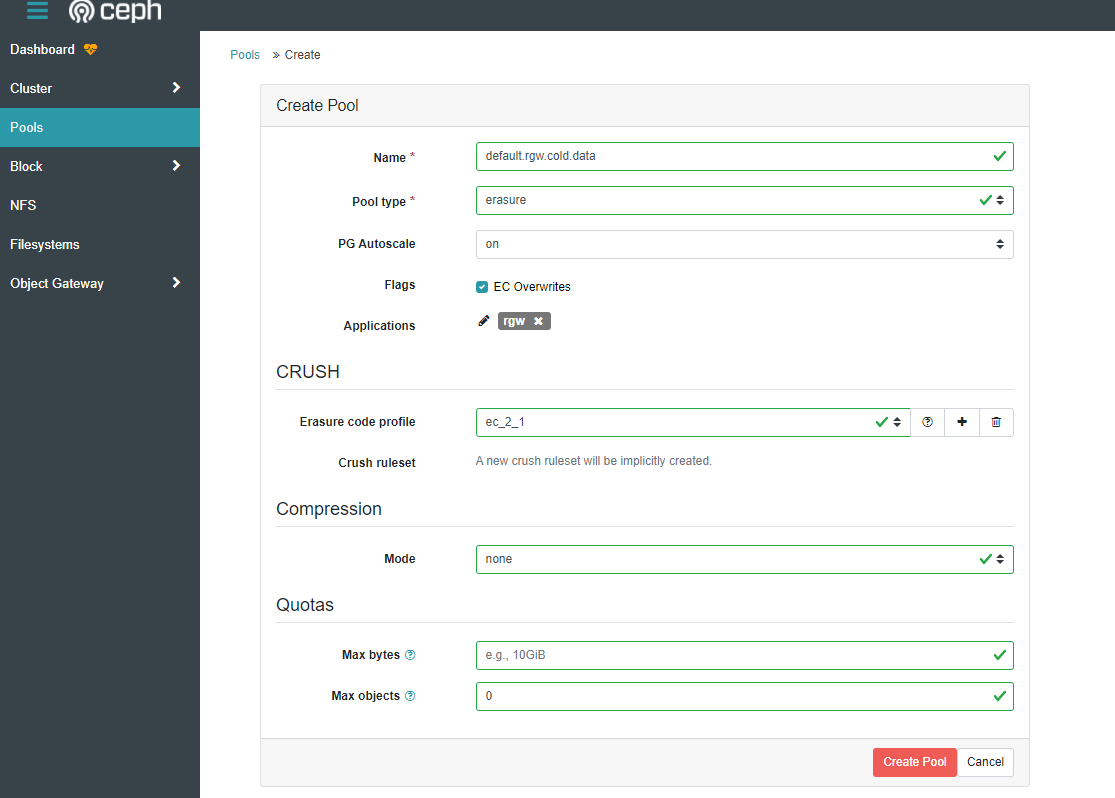
- The output should show that under storage classes “COLD” the new data pool is assigned to it. Next, create the new pool. This can be done via the dashboard for ease where you can select the pool type (replicated or erasure coded) the number of placement groups, the type of compression, etc. Just make sure the pool name matches the one used in the command above.
- The new storage class is now complete and ready to use. The next steps are to create and design a lifecycle to do exactly what you want it to do. This guide will use a few simple examples.
Creating S3 Lifecycle management policies
- The next step will require s3cmd to be installed on the machine. You can also use a tool like S3 browser for Windows which allows you to create s3 ACL policies.
- This guide will use s3cmd. Install s3cmd and then configure it using their built-in tool using –configure. Enter the access key and secret key for the s3 bucket the s3 policy will be built on, and point it to the proper RGW endpoint and port.
- The below example will provide formatting for settings.
- Ensure for “DNS-style bucket+hostname:port template” is simply the IP address of your RGW and the port it uses without the bucket or location vars used.
- Default region is not needed. You can simply press enter on default region and encryption.
- At the end of the config, s3cmd will ask to test the settings. If it succeeds, you can continue. S3cmd will generate a config file at /root/.s3cfg.
root@octrgw1:~# apt install s3cmd

root@octrgw1:~# s3cmd –configure
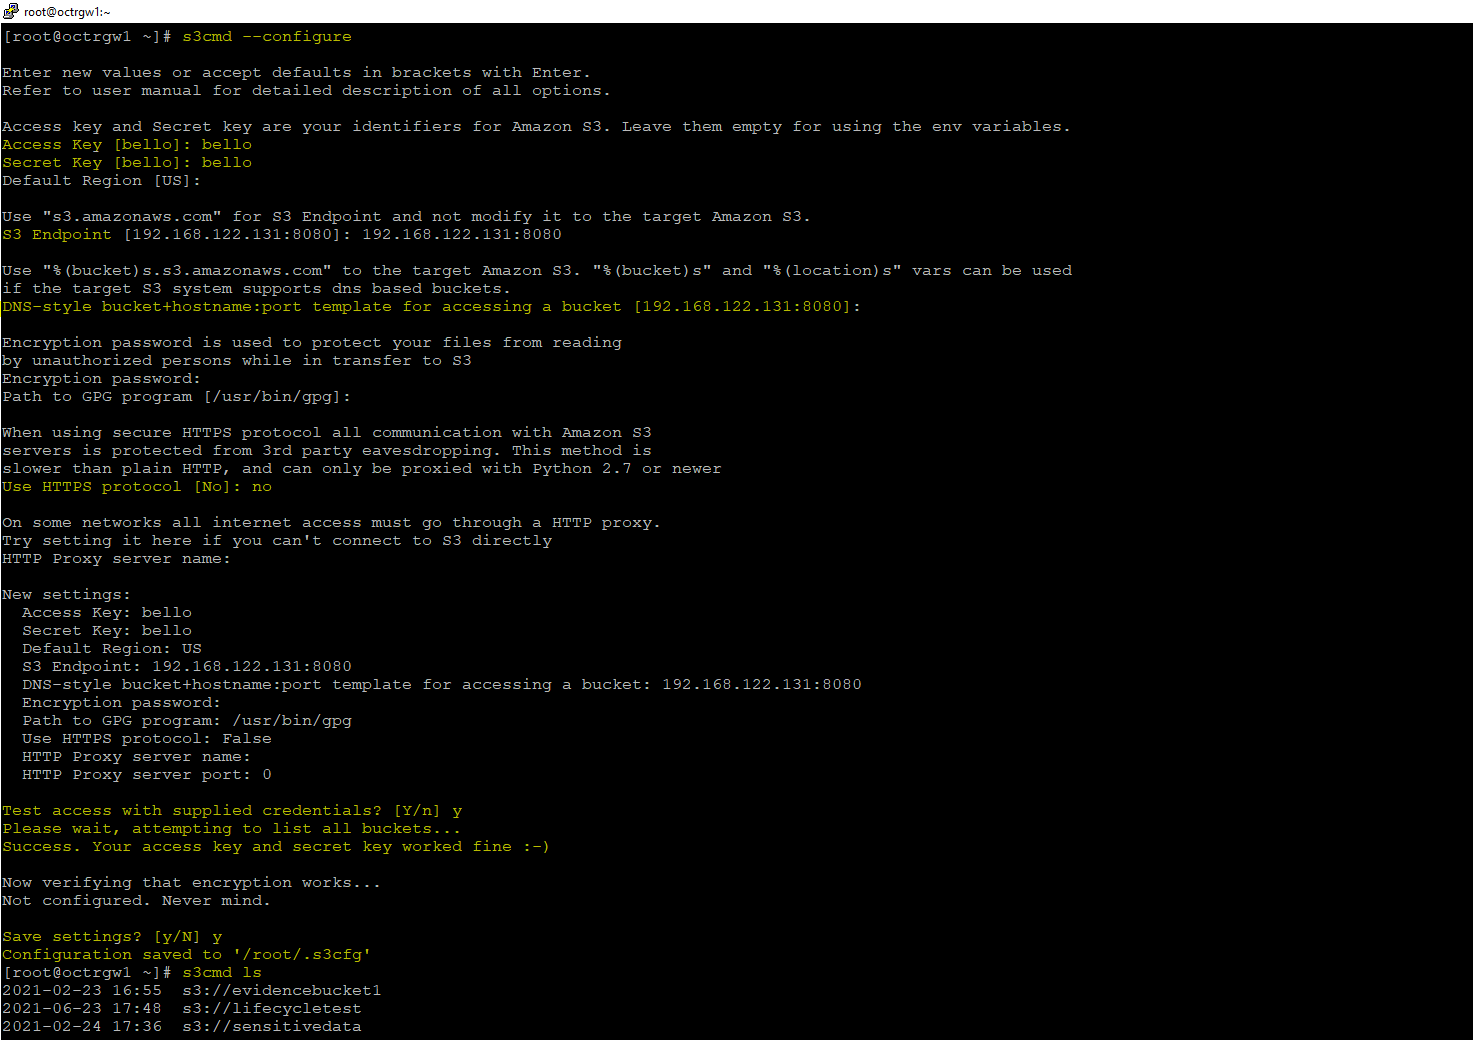
- To test functionality, run s3cmd ls. This should list the buckets tied to the provided access key and secret key.
Lifecycle configuration
- With the storage class created and s3cmd configured, we can now create some lifecycle management rules. These management rules are to be created in an xml file which can then be passed to the bucket with s3cmd.
- A more comprehensive list on lifecycle rules can be found here. However, please note this page is directed towards Amazon S3 and so remember some things may not carry over 1 to 1 with Ceph, although most of the rules should.
- With the lifecycle management tool, you have the option for “transition” and “expiration”
- You can create rules that have 2 steps that incorporates both.
- In order to create these lifecycle rules, create an XML file and create your rule within that XML file.
- For example, a rule can be made to move objects to a new storage class after 1 month, and then expire them to be deleted after 2. That lifecycle rule would look something like this:
<LifecycleConfiguration>

  <Rule>

    <ID>Transition then Expire Rule</ID>

    <Filter>

       <Prefix></Prefix>

    </Filter>

    <Status>Enabled</Status>

    <Transition>

      <Days>30</Days>

      <StorageClass>COLD</StorageClass>

    </Transition>

    <Expiration>

      <Days>60</Days>

    </Expiration>

  </Rule>

</LifecycleConfiguration>
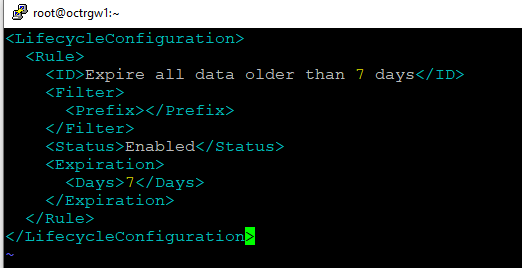
- For a simpler rule, you can dictate simply to delete objects older than a set date. This rule would look similar to this:
<LifecycleConfiguration>

  <Rule>

    <ID>Expire after 1 year</ID>

    <Filter>

       <Prefix></Prefix>

    </Filter>

    <Status>Enabled</Status>

    <Expiration>

      <Days>365</Days>

    </Expiration>

  </Rule>

</LifecycleConfiguration>
- Finally, for a rule to only move objects to a new storage class, and not mark them to be expired, you could use a rule like this:
<LifecycleConfiguration>

  <Rule>

    <ID>Transition objects to COLD storage class</ID>

    <Filter>

       <Prefix></Prefix>

    </Filter>

    <Status>Enabled</Status>

    <Transition>

      <Days>30</Days>

      <StorageClass>COLD</StorageClass>

    </Transition>

  </Rule>

</LifecycleConfiguration>
- Inside these rules you will also find “Prefix”. This allows flexibility to have different rules running all on a single bucket and as long as the objects are uploaded with the correct prefix, the rule will only apply to it. This can allow you to have multiple expire rules within a single bucket. This would look something like this:
<LifecycleConfiguration>

  <Rule>

    <ID>prefix expiration</ID>

    <Filter>

       <Prefix>dir1</Prefix>

    </Filter>

    <Status>Enabled</Status>

    <Expiration>

      <Days>120</Days>

    </Expiration>

    <Filter>

       <Prefix>dir2</Prefix>

    </Filter>

    <Status>Enabled</Status>

    <Expiration>

      <Days>60</Days>

    </Expiration>

  </Rule>

</LifecycleConfiguration>
- The above rule will expire all objects after 120 days with the prefix of dir1, and will expire all objects after 60 days with a prefix of dir2.
- To put created rules in effect, create a new xml file on the same host s3cmd is installed.
- Copy any rule above along with any changes needed for your environment.
- Example:
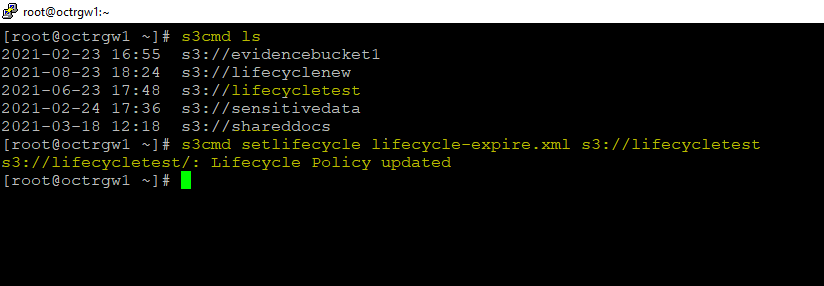
- Save the file. This file is saved as lifecycle-expire.xml . The s3 bucket that this policy will be attached to is called lifecycletest.
- Using s3cmd, set the lifecycle policy on the correct bucket.
root@octrgw1:~# s3cmd setlifecycle lifecycle-expire.xml s3://lifecycletest
- Test to see if the lifecycle has been set.
root@octrgw1:~# s3cmd info s3://lifecycletest
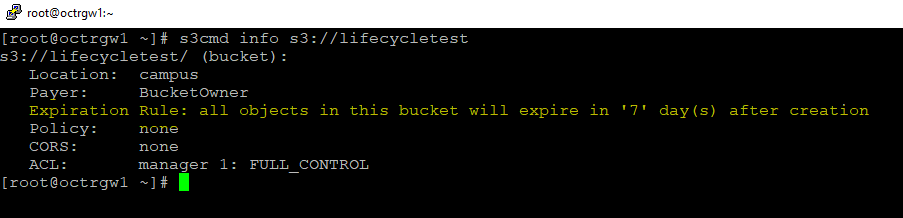
When using transition rules instead of expire rules, s3cmd info will not properly list it. You will need a tool like S3 browser to view the lifecycle rule. S3 browser can also be used to create these rules. The only downside of using S3 Browser is that it does not allow the use of custom storage classes such as the use of “COLD”. It uses only standard Amazon S3 naming, so when using transition rather than expiration it is still better to use s3cmd and the XML files.
- A guide for s3 browser lifecycle management can be found here: https://s3browser.com/bucket-lifecycle-configuration.aspx
Verification
- If you would like to create and test some of these rules, it is best to use Ceph’s built in RGW debug mode. This allows a set period of time (typically 60 seconds) will correlate to 24 hours. This allows fast testing of rules to ensure they are doing exactly what is expected, and gives the ability to iterate quickly.
- To do this, you must SSH into your nodes acting as your RGW’s. Once inside, open ceph.conf with sudo permissions. It can be found at /etc/ceph/ceph.conf
- Add the following line to the bottom of the conf file:
rgw lc debug interval = 60
- This sets the lifecycle interval to correlate every 60 seconds to 24 hours. Make sure if you are using multiple RGW’s to add this to each RGW’s config file.
- Once the config file is saved, restart the RGW’s. Replace the name octrgw1 with the name of your RGW.
root@octrgw1:~# systemctl restart ceph-radosgw@rgw.octrgw1
Troubleshooting
- If you are having trouble with your lifecycle rules, it is most likely because the rules are written incorrectly, or the RGW debug interval is not working.
- In order to check the status of your RGW lifecycle rules, run the following command on a node with an admin keyring on it.
root@octrgw1:~# radosgw-admin lc list
- This lists the lifecycle rules you have in place. If they are not set to “complete” you can force Ceph to start the rule by running the following command:
root@octrgw1:~# radosgw-admin lc process
Views: 5664