Scope/Description
- This article walks through the process of adding an external Ceph Cluster to a Proxmox Virtual Enviroment for Virtual Machine (VM) Image storage.
Prerequisites
- A running Ceph Cluster
- A storage pool created for rbd storage
- A running Proxmox 6.2 or greater environment
Steps for EC Pools
- The process differs depending on storage pool type, replicated or erasure code.
- Note that you can add as many replicated pools as you want, only one erasure code pool is supported.
- On the Proxmox server ensure the following directories exist. Create them if not
- /etc/ceph
- /etc/pve/priv/ceph
- Copy the ceph.conf and ceph.client.admin.keyring into /etc/ceph from a ceph monitor to the proxmox node
[root@monitor~]# scp ceph.conf root@<proxmoxhost>:/etc/ceph
[root@monitor~]# scp ceph.client.admin.keyring root@<proxmoxhost>:/etc/ceph
- First, we’ll cover adding an Erasure Code pool for storage into Ceph.
- Since Erasure Code RBDs store there metadata in a replicated rbd pool, two pools are needed to complete the following steps.
- pve_rbd. A replicated rbd pool to store the rbd metadata.
- pve_rbd_ec. The dedicated EC data pool to store the actual rbd data.
- SSH into Proxmox host, or use Proxmox GUI shell
- Copy the ceph.conf into /etc/pve/priv/ceph, changing the name of the file to the name of the rbd pool. In the below example the rbd pool name is “pve_rbd_ec”
[root@proxmox~]# cp /etc/ceph/ceph.conf /etc/pve/priv/ceph/pve_rbd_ec.conf
- Copy the admin key to /etc/pve/priv/ceph, changing the name of the file to the name of the rbd pool. In the below example the rbd pool name is “pve_rbd_ec”
[root@proxmox~]# cp /etc/ceph/ceph.client.admin.keyring /etc/pve/priv/ceph/pve_rbd_ec.keyring
- Open this file in a text editor and add the bolded lines at the bottom of the file. In the below example the rbd Erasure Code pool is called “pve_rbd_ec”.
[global]
cluster network = 192.168.0.0/16
fsid = cc1be5c3-7b91-4226-9732-22f43b69d34e
mon host = [v2:192.168.20.11:3300,v1:192.168.20.11:6789],[v2:192.168.20.12:3300,v1:192.168.20.12:6789],[v2:192.168.20.13:3300,v1:192.168.20.13:6789]
mon initial members = zmon1,zmon2,zmon3
osd pool default crush rule = -1
public network = 192.168.0.0/16

[client]
rbd default data pool = pve_rbd_ec
Note: For Proxmox 7.0, this field should be included under [global] without [client]
Example below.
[global]
cluster network = 192.168.0.0/16
fsid = cc1be5c3-7b91-4226-9732-22f43b69d34e
mon host = [v2:192.168.20.11:3300,v1:192.168.20.11:6789],[v2:192.168.20.12:3300,v1:192.168.20.12:6789],[v2:192.168.20.13:3300,v1:192.168.20.13:6789]
mon initial members = zmon1,zmon2,zmon3
osd pool default crush rule = -1
public network = 192.168.0.0/16
rbd default data pool = pve_rbd_ec
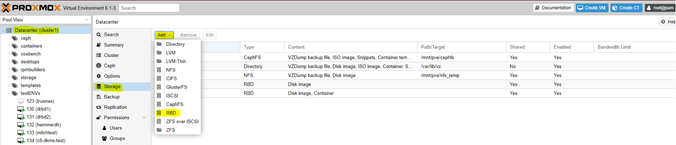
- Access the webUI to now create the Ceph RBD storage there.
- From the webUI, click on Datacenter, then Storage, and finally Add and RBD:
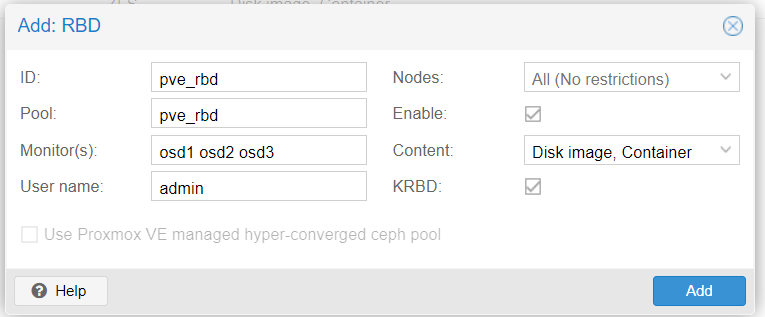
- In the dialog box that pops up add the ID. This must match the name of the keyring file you created in /etc/pve/priv/ceph.
- Add the name of the pool. This is the “pve_rbd” replicated pool, it will use “pve_rbd_ec” as the default data pool.
- Add the monitor hosts. Use IP addresses unless you have a DNS that can translate the FQDN.
- Add the user name. In this case it is admin.
- Check off KRBD.
- The Proxmox host can now use Ceph RBD’s to create disks for VM’s
ProxMox 8
Run the following from one of the proxmox host
pvesm add rbd <storage-name> –pool <replicated-pool> –data-pool <ec-pool>
Add the mon ips in the proxmox UI under the newly added RBD under storage
Copy the keyring to “/etc/pve/priv/ceph.client.admin.keyring” and to “/etc/pve/priv/ceph” and name the keyring your ec pool name (ID)
Steps for Replicated Pools
- Next, we’ll cover Replicated pools. At least one replicated pool is needed to complete the following steps.
- pve_rbd. A replicated rbd pool to store the rbd metadata and rbd data.
- SSH into Proxmox host, or use Proxmox GUI shell
- Copy the ceph.conf into /etc/pve/priv/ceph, changing the name of the file to the name of the rbd pool. In the below example the rbd pool name is pve_rbd.
[root@proxmox~]# cp /etc/ceph/ceph.conf /etc/pve/priv/ceph/pve_rbd.conf
- Copy the admin key to /etc/pve/priv/ceph, changing the name of the file to the name of the rbd pool. In the below example the rbd pool name is pve_rbd.
[root@proxmox~]# cp /etc/ceph/ceph.client.admin.keyring /etc/pve/priv/ceph/pve_rbd.keyring
- Access the webUI to now create the Ceph RBD storage there.
- From the webUI, click on Datacenter, then Storage, and finally Add and RBD:
- In the dialog box that pops up add the ID. This must match the name of the keyring file you created in /etc/pve/priv/ceph.
- Add the name of the pool.
- Add the monitor hosts. Use IP addresses unless you have a DNS that can translate the FQDN.
- Add the user name. In this case it is admin.
- Check off KRBD.
- The Proxmox host can now use Ceph RBD’s to create disks for VM’s
Verification
- After creating a disk, verify the ec pool is set as the rbd data pool. The naming convention of proxmox rbds is “VM-ID-DISK#”. In the below example the VM ID is 133 and its the second disk attached to the VM. Bolded below, you can see the data_pool is correctly set to the ec pool
[root@proxmox~]# rbd info vm-133-disk-1
rbd image 'vm-133-disk-1':
size 32 GiB in 8192 objects
order 22 (4 MiB objects)
snapshot_count: 0
id: 65cfae27458d39
data_pool: rbd_ec
block_name_prefix: rbd_data.1.65cfae27458d39
format: 2
features: layering, exclusive-lock, object-map, fast-diff, deep-flatten, data-pool
op_features:
flags:
create_timestamp: Wed Oct 14 16:11:36 2020
access_timestamp: Wed Oct 14 16:11:36 2020
modify_timestamp: Wed Oct 14 16:11:36 2020
Troubleshooting
Views: 9512