Scope/Description
This guide will run through the steps of adding new VIP’s (virtual IP addresses) with pacemaker to service secondary/tertiary subnets from the same gateway servers to allow NFS shares to be exported via additional subnets.
Prerequisites
This guide assumes the cluster is up and functioning, with NFS deployed with 45Drives Ansible playbooks using a single VIP in active/passive mode.
The user must have dedicated network interface(s) to have a dedicated static IP assigned to the secondary subnet(s) before they can begin creating VIP’s with pacemaker.
Steps
- Use “nmtui” to configure a static IP on the new subnet on the correct NIC port that will connect to this network. This will require input from the end customer, because they may be using VLAN tagging or they might just have dedicated hardware for each network.
- Once both Ceph gateways have at least 1X network interface dedicated to each new subnet the user wishes to export NFS to, take time to run ping tests and make sure all networks are communicating as expected.
- Ensure when configuring interfaces on both gateways that both gateways keep the same network interface names for the same subnets.
- For example: if you have one interface on both gateways that have a static IP on the 10.10.10.0/24 network, make sure those interfaces have the same name. If they don’t, this can be changed in nmtui as well.
- Take note of the interface name and the static IP of each subnet you want to create a VIP for to continue to the next step.
- Open a terminal on one of the gateway nodes, run “pcs status” you will get an overview of your current NFS VIP configuration. It should look something like this:
[root@octnfs1 ~]# pcs status
Cluster name: hacluster
Cluster Summary:
* Stack: corosync
* Current DC: octnfs2 (version 2.0.4-6.el8_3.1-2deceaa3ae) - partition with quorum
* Last updated: Tue Jun 1 12:47:23 2021
* Last change: Tue Jun 1 12:09:20 2021 by root via cibadmin on octnfs2
* 2 nodes configured
* 3 resource instances configured

Node List:
* Online: [ octnfs1 octnfs2 ]

Full List of Resources:
* nfs_server (systemd:nfs-ganesha): Started octnfs2
* nfs_ip (ocf::heartbeat:IPaddr2): Started octnfs2

Daemon Status:
corosync: active/enabled
pacemaker: active/enabled
pcsd: active/enabled
- As you can see above, we currently have 2 resources in this Pacemaker cluster. The NFS server itself, and the single NFS virtual IP. The next step is to begin creating one or more new virtual IP’s tied to the newly configured network interfaces running on different subnets.
- To create a new VIP run the following command:
[root@octnfs2 ~]# pcs resource create nfs_ip2 ocf:heartbeat:IPaddr2 ip=172.16.152.20 cidr_netmask=24 nic=ens7 op monitor interval=30s
This command is creating a new VIP resource called nfs_ip2.
This command is creating a VIP on the 172.16.152.0/24 network
This command is ensuring that this VIP always runs on the ens7 network interface, because that is the NIC that is dedicated to the 172.16.152.0/24 network.
Make sure to replace the ip with an unused IP on the correct chosen subnet
Make sure to replace the cidr_netmask with the correct subnet size
Make sure to replace the NIC with the correct network interface
- If the command completed correctly, you should get no output. re-run “pcs status” to make sure it completed successfully, and that the new resource is set to “started” state.
- The VIP should now be up on one of your two gateways.
- Next, you must restart nfs-ganesha on both gateway servers.
[root@octnfs1 ~]# systemctl restart nfs-ganesha.service
[root@octnfs2 ~]# systemctl restart nfs-ganesha.service
- You can now begin testing by creating a new NFS export and setting it to be dedicated to the new subnet.
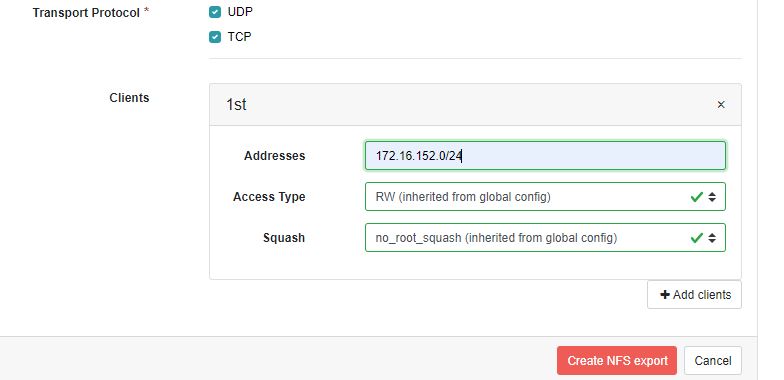
- For best practices, you will want to lock each share down to the subnet you wish to share it out to. This can be configured when creating or editing a NFS export in the Ceph dashboard. It is the last thing you can configure on this page. In this example, I am locking it down to the entire 172.16.152.0/24 network:
Verification
- Log in to a machine on one of these new subnets and ensure NFS-utils is installed.
- Attempt to mount the newly created share.
Troubleshooting
- If the NFS share is not mounting, ensure you use the -v flag at the end of the nfs mount command to get as much info as possible.
- Ensure that the firewall on your gateway nodes is allowing NFS traffic out.
- Ensure the VIP’s are up and running on the correct interfaces by using “ip a”
- Ensure that your PCS resources are enabled and running by using “pcs status”