Scope/Description
- This guide will show how to create a new CephFS user, set permissions for CephFS directories, set quotas, mount the share, and make them persistent on the client.
- Assuming a CephFS directory setup with staging as a subdir, where cephx user:admin has rights to everything and cephx user:staging only has access to staging dir
Prerequisites
- Ceph Cluster using CephFS
- Linux Client to mount CephFS shares
Steps
Generating the CephFS client keyring
- First, we’ll have to generate the keyring for our CephFS user. Note that the admin cephx user will have full access to all of the ceph filesystem, and the user we create will only have access to certain CephFS directories.
root@ubuntu-45d:~# ceph-authtool --create-keyring /etc/ceph/ceph.client.staging.keyring --gen-key -n client.staging
- After creating the user and keyring go to the new /etc/ceph/ceph.client.staging.keyring and edit the file to have the needed capabilities.
- Add the capabilities to the users keyring, the file should look like the below when complete. Be sure to edit the file paths to the correct location depending on environment.
- Also note the key will be different from the example below. This is normal.
[client.staging]
key = AQDG1ypfl7roNBAAjPjUgpTNn93UB3jkTFEGjw==
caps mds = "allow r path=/, allow rwps path=/staging"
caps mon = "allow r"
caps osd = "allow *"
r = read
w = write
p = Layout and Quota restriction (i.e data layouts like dir pinning, quotas, extended attributes, etc. essentially you need this to set xattrs)
s = snapshots
Importing the CephFS client keyring
- After adding the new capabilities we now need to import the new client into the Ceph Cluster.
root@ubuntu-45d:~# ceph auth import -i /etc/ceph/ceph.client.staging.keyring
Creating CephFS secret file
- Once the keyring is created and introduced into the Ceph Cluster, we would run the following command to create a secret file from the key to be used for authentication to mount on the client.
root@ubuntu-45d:~# ceph auth get-key client.staging > staging.secret
Copying secret file to client machine(s)
- Next, we’ll copy the secretfile to the client machine.
root@ubuntu-45d:~# scp staging.secret root@clientIP:/etc/ceph
Creating CephFS Shares/Directories
- Now, we’ll look at creating the CephFS directories to be shared out(if the directory does not already exist).
- Mount the CephFS somewhere in the system to be able to create directories, first let’s create the mountpoint. This can be anything, however we’ll use /mnt/cephfs.
root@ubuntu-45d:~# mkdir /mnt/cephfs
- Now lets mount the root directory now as admin user.
root@ubuntu-45d:~# mount -t ceph MON_IPs:/ /mnt/cephfs -o name=admin,secretfile=/etc/ceph/admin.secret,noatime
- And next create a subdirectory name staging.
root@ubuntu-45d:~# mkdir /mnt/cephfs/staging
- Now we’ll look at mounting CephFS on the client machine.
- First, make the directory for mounting on the client machine.
root@client-45d:~# mkdir /mnt/staging
- And now add the mount to the client.
root@client-45d:~# mount -t ceph MON_IPs:/staging /mnt/staging -o name=staging,secretfile=/etc/ceph/staging.secret,noatime
Verification
- To verify it is successful on the client create a new directory within the /mnt directory.
root@client-45d:~# mkdir /mnt/cephfs
- Now cd into the new dir.
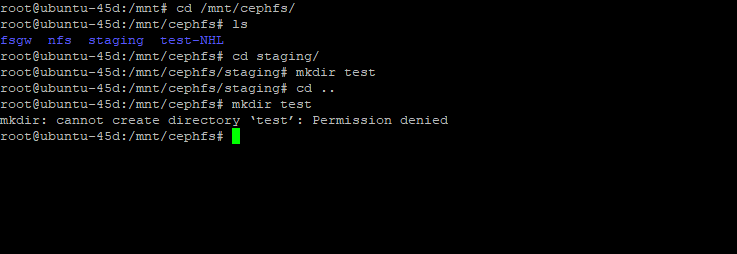
root@client-45d:~# cd /mnt/cephfs
- Run an ls command and choose one to cd into.
root@client-45d:~# cd /mnt/cephfs/*
- Now try to create a file with the touch command.
root@client-45d:~# touch test
- If successful you should get a permission denied warning as the client only has access to the /mnt/cephfs/staging dir.
Troubleshooting
- Ensure you are using the correct syntax to mount your CephFS share.
Further Reading
Views: 4981