Scope/Description:
This article describes setting your IPMI connection to access the storinator using client systems on the network.
Background
Remote Access is available for all Storinator products. IPMI or Intelligent Platform Management Interface is an open, industry-standard interface that was designed for the management of server systems over network. It enables you to monitor and control your server platform, as well as to retrieve information about your server platform is a standard. It supports FRU inventory reporting, system monitoring, logging of system events, system recovery (system reset or power off) or alerting.
This is very similar to DRAC, a proprietary offering from Dell. ILO is the HP ProLiant variant. ILOM for Sun/Oracle. In some cases, you may hear the terms used interchangeably.
These Solutions are proprietary lights-out management solutions provide more integration with the hardware and often time have nicer features (monitoring, logging, access) than a generic IPMI implementation. However some require special licensing to use. IPMI is free. But what is more important is that all of the aforementioned service processors – iDRAC, iLO or ILOM – are compliant with this standard (or with a specific version of it) so you can either use vendor specific tools to communicate with them or standardized IPMI tools. This may be an advantage when you need to integrate the platform with some monitoring system which supports IPMI standard but not a specific service processor.
Steps
Setting Up Remote Access with IPMI (DHCP)
- Plug an Ethernet cable from the IPMI port on the back of the unit to a DHCP enabled port on your network switch.
- The IPMI port for the X10DRL motherboard is pictured here above the (2) USB 2.0 ports.
- The IPMI port for the X11DPL motherboard is pictured here above the (2) USB 2.0 ports.
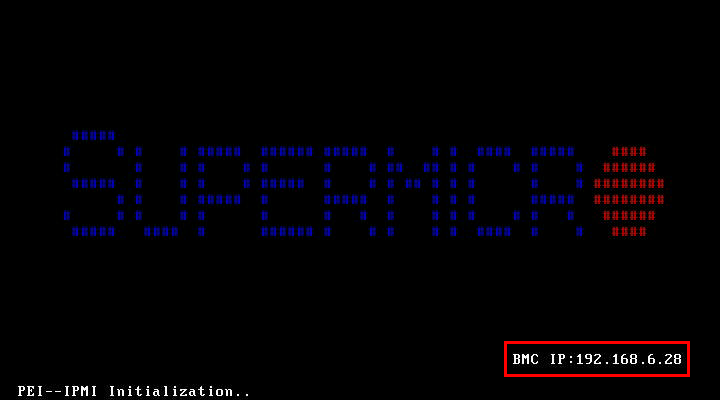
- Newer (=> X10/X11 boards) will show the IPMI address during bootup in the bottom right hand corner.
- Initial unit configuration may require access to the BIOS but then all management can be done using IPMIView or through the HTML5 Web Console (Chrome/Firefox).
- To use IPMIView you can download it here. You can also download other versions for Android and iOS as well. To learn more about IPMIView, click here.
- Pictured below is the IPMI set up screen, which you can access just by typing in the IPMI BMC IP address into Chrome/Firefox and get full control.
- To gain full access and control of the machine through a Remote Desktop Java Application, Click on the window inside the ‘Remote Console Preview” shown in the above image which will download a launch.jnlp file to you computer. Chrome may ask you if you want to keep the file, which you need to do and then once you open that file the Java window will appear. With the Remote Desktop Java Application you can also mount virtual media such as a CentOS or FreeNAS ISO to either load or reload the current operating system. See KB450190 – Mounting IPMI virtual media to perform this task.
Setting Up Remote Access Static IP (IPMI) via BIOS
If you the your switch is not DHCP enabled and need to set up a Static IP for IPMI you can do this from the BIOS within the IPMI section.
- When the computer is turning on and you see the SuperMicro logo you can start pressing the delete key to enter into the BIOS.
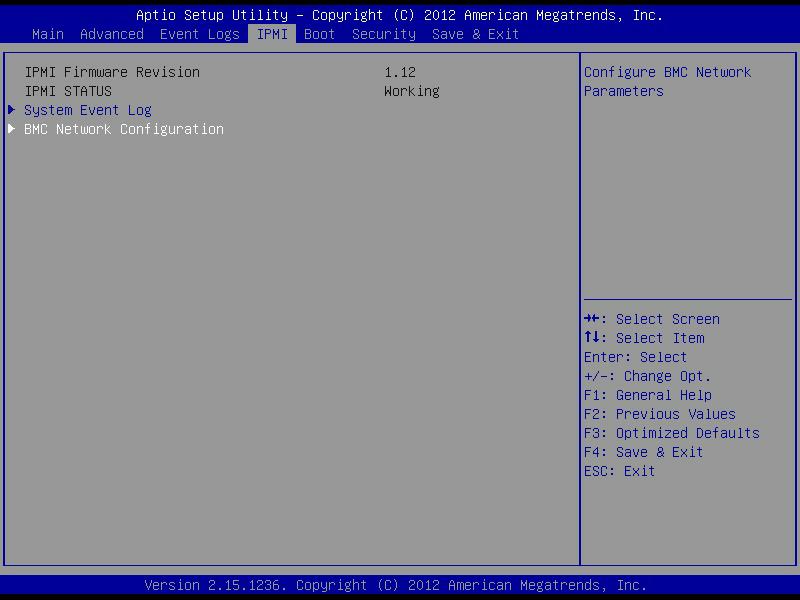
- Once the BIOS loads you use the arrow keys to move over to the IPMI section.
- Highlight BMC Network Configuration and hit the Enter key.

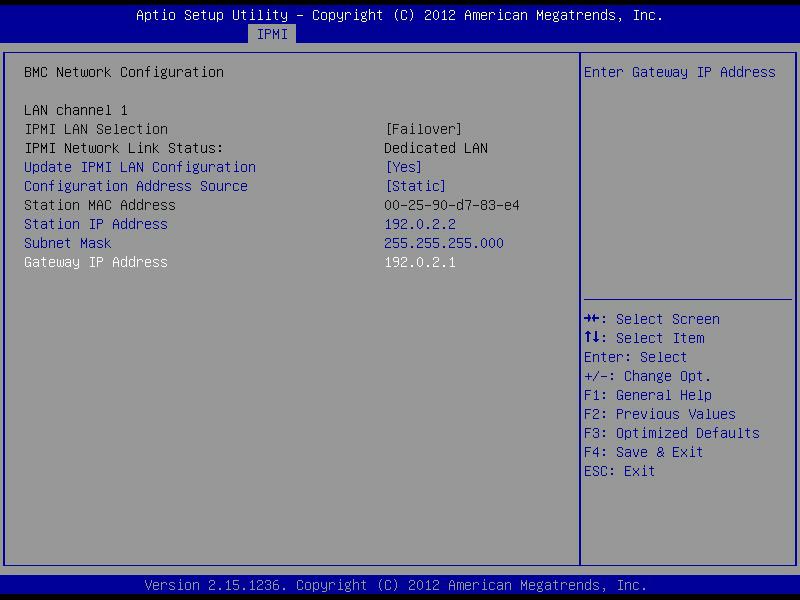
4. Once you are in the Configuration, change the Configuration Address Source to Static and fill out the rest of the information required. (IP Address, Subnet Mask & Gateway IP Address)
5. After the information is filled in, hit the F4 key to Save & Exit. Confirm the command and the unit will restart.


