Table of Contents
Scope/Description
- This article will outline how to create an Erasure Code Pool in the Ceph Dashboard along with configuring the Erasure Code Profile necessary for the pool to use.
Prerequisites
- An existing Ceph Cluster
Steps
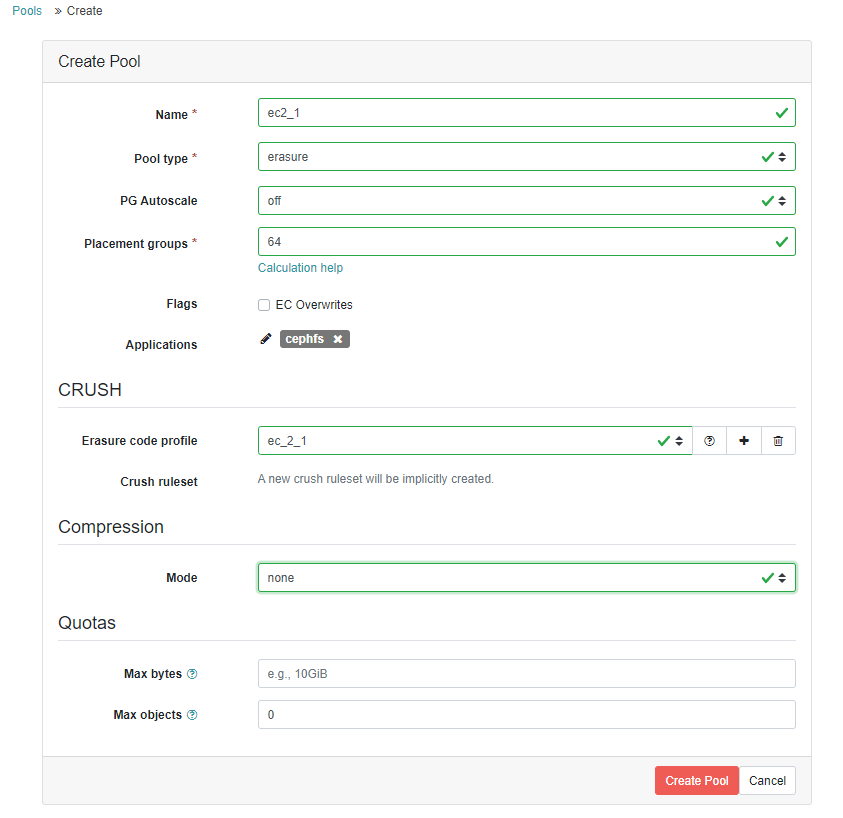
- Go to your ceph dashboard and go to the Pools section.
- Click Create to start creating a new pool.

- For Pool type, select erasure from the drop down list.
- For Placement Groups(PGs), it’s best to start low, such as 64, and manually increase the amount, as you cannot decrease it after it has been increased.

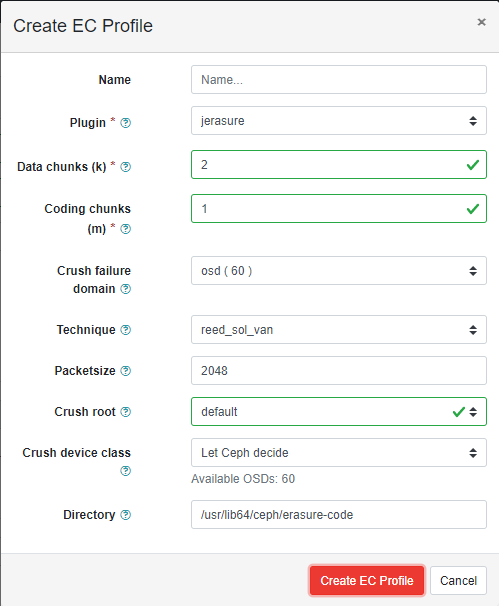
- For Erasure Code Profile, the default value for Ceph Nautilus is 2+1, but Octopus is 4+2. If you’re in need of a different profile, click the “+” button to create a new profile.
- For this example, we’ll be creating a 2+1 EC profile.
- When creating a profile your Data Chunks will be the first number in the EC profile, in this example that is 2.
- Your Coding Chunks will be the second number in the EC profile, in this example that is 1.
- The Crush Failure Domain will stay at host level unless a custom Crush Map of the data on the cluster is being used.

- Once the EC profile is created, select it from the Erasure Code Profile drop down menu.
- Select the Applications for the pool you’re creating. In this example, a pool for filesystem access is being created, which includes CephFS, SMB and NFS, so select cephfs.
- Ensure you also select the EC Overwrites option if your use case requires it.

- Once these values are input, click Create Pool. This will create the pool.

- The newly created pool will need to be added to the cephfs filesystem for use with any shares that have been created or planned to be created.
- Log into any nodes of the ceph cluster and run the following command:
root@ceph-45d:~# ceph fs add_data_pool cephfs ec_2_1

- Once the pool has been successfully added, it can be verified by checking the Filesystems section of the Ceph Dashboard. Check for pools that are available under cephfs.

- We will need to create the admin.secret to mount the filesystem
root@ubuntu-45d:~# cd /etc/ceph
root@ubuntu-45d:~# ceph auth get-key client.admin > admin.secret
root@ubuntu-45d:~# mkdir /mnt/cephfs
- The existing Ceph filesystem will need to be mounted for the filesystem to be able to use the newly created Erasured Coded pool for storage.Once the keyring is created and introduced into the Ceph Cluster, we would run the following command to create a secret file from the key to be used for authentication to mount on the client.Once the keyring is created and introduced into the Ceph Cluster, we would run the following command to create a secret file from the key to be used for authentication to mount on the client.
root@ceph-45d:~# mount -t ceph :/ /mnt/cephfs -o name=admin,secretfile=/etc/ceph/admin.secret

root@ceph-45d:~# setfattr -n ceph.dir.layout.pool -v data_ec /mnt/cephfs
![]()
Verification
- Run the following command on the mount location of the filesystem:
root@ceph-45d:~# getfattr -n ceph.dir.layout /mnt/cephfs

- The output from this command, pool=ec_2_1 confirms the filesystem is using the Erasure Coded pool that has been created for storage.
Troubleshooting
- If “setfattr” or “getfattr” commands fail, the attr package may need to be installed.
root@ceph-45d:~# apt install attr
[root@ceph-45d ~#] yum install attr
Views: 3599