Scope/Description
Note: While the information in this article is accurate, it reflects the previous migration method. For the updated process, please refer to the following link: https://knowledgebase.45drives.com/kb/kb450347-migrating-vm-disks-from-vmware-to-proxmox-using-proxmox-import-tool-wizard/
- This guide will run through a step-by-step process to migrate your ESXi disks that exist in a VMDK format over into Proxmox, and then re-build those VMDK’s into a format that Proxmox can understand and use within Proxmox VM’s.
- VMware has 2 main ways it consumes network storage. This is where VMware creates its VMDK files which act as disks within VM’s.
- The first way is with simple NFS volumes. You have an NFS server that you use to map a NFS volume to VMware, and when you create a disk within VMware, it creates a VMDK file on that NFS share.
- The second way is via iSCSI. You have an iSCSI server that you use to carve up block devices that are shared directly to VMware. VMware then creates its own file system on top of it called “VMFS”. Once that file system is created, VMware again just creates VMDK files which act ask disks within VM’s.
Prerequisites
- Prior to starting, you will want to have a Proxmox virtual environment up and running. You will also need to have at least one storage pool set up to move your VM image to. You will also want to have a virtual machine created within Proxmox VE to move the disk to. This Virtual Machine does not have to have any disks, it just needs to be created within Proxmox VE, because you will use the VM ID when mapping the image.
Steps
Depending on your use case you may have a NFS datastore or a ISCSI datastore. Depending on your use case follow the steps below. If you have both then follow both set of steps.
Shutdown and Mount NFS Datastore(s) to Proxmox
- Shut down all VM’s on your ESXi environment that are hosted on your NFS datastore.
- SSH into your Proxmox machine.
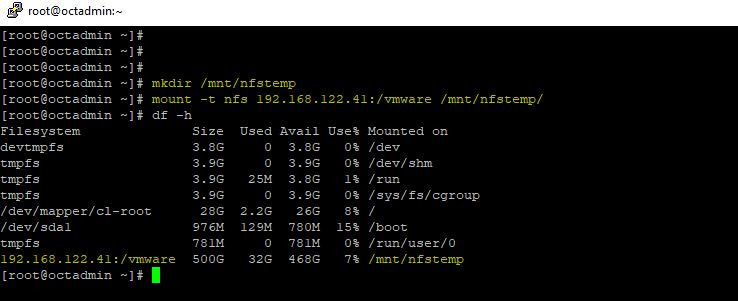
- Mount the NFS share temporarily that ESXi is using that contains all of the disk images you are looking to migrate.
mkdir /mnt/nfstemp

mount -t nfs {Server IP}:/vmware /mnt/nfstemp
- Proceed to Section: Migration to Proxmox, unless you also have a ISCSI datastore.
Shutdown and Mount iSCSI Datastore(s) to Proxmox
- Shut down all VM’s on your ESXi environment that are using the iSCSI disk you are about to map to Proxmox.
- Next, you will want to mount the iSCSI disk(s) to your Proxmox environment. The iscsiadm tool should be already installed on Proxmox, but if for some reason it is not, run:
apt install iscsiadm
- If you don’t know your iSCSI IQN name, you can run a request command as long as you know your iSCSI portal IP. This will list all available IQN's that are on this IP address
<root@45prox:~#>iscsiadm --mode discovery -t sendtargets --portal <ip-address>
- Map the iSCSI disk or disks that contain all of the VM disks you want to migrate. This can be done with the iscsiadm tool. Map with the following syntax:
<root@45prox:~#>iscsiadm --mode node --targetname iqn.your.iscsi.iqn.number.here --portal <ip-address>:3260
By default, iSCSI uses port 3260, if your deployment uses something different, replace the port number.
This will map your iSCSI LUN to the Proxmox machine. It will map them as regular disks with sd names such as sdb, sdc, sdd etc. If there is a VMFS file system on the iSCSI LUN, it will be on a partition of this disk, Such as sdb1.
- Next, you need to be able to mount the file system ESXi uses (VMFS) in order to pull our VM disk images from it so they can be converted to raw format so they can be mapped to a Proxmox VM. To do this, we need to install vmfs6-tools.
<root@45prox:~#> apt install vmfs6-tools
- If your repos fail to find this package, you can instead pull it from a mirror here with wget or curl, and then install it:
wget http://ftp.us.debian.org/debian/pool/main/v/vmfs6-tools/vmfs6-to ols_0.1.0-3_amd64.deb

dpkg -i vmfs6-tools_0.1.0-3_amd64.deb
- Next, create a directory to mount the VMFS file system
<root@45prox:~#> mkdir /mnt/vmfstemp
- List the block devices to find the iSCSI disk(s) that you have mapped to this machine.
<root@45prox:~#> lsblk
- Once the iSCSI disk has been identified, we will use the vmfs6-fuse command to mount it on the Proxmox system. Make sure to replace “sdb1” with the disk letter name of the iSCSI device.
<root@45prox:~#> vmfs6-fuse /dev/sdb1/mnt/vmfstemp
- The VMFS file system can now be navigated. If you cd into the VMFS mount point and view the directories, you will see a directory for each VM. Inside of these directories, you can find the VMDK files.
- Proceed to Section: Migration to Proxmox.
Migration to Proxmox
- If you have followed the guide up to this point, you should have either an NFS share mounted with VMDK files browsable or an iSCSI disk mounted with VMFS and again have VMDK files browsable.
- The next steps are to convert these VMDK files into a raw format so Proxmox can use them in a VM.How this is done will depend on what type of storage you are using for your Proxmox VM’s.
- This guide will cover both RBD and ZFS, but all you need is the storage ID.
- You will want to have a VM created in Proxmox already that you plan on attaching the disk to. So, if you are migrating Windows VM’s from VMware, you will create a Windows VM in Proxmox. If the disk you are migrating is an actual OS drive, you can simply create an empty VM, so you can migrate the OS drive directly to a virtual machine.
- Move into the directory where the VMDK you want to migrate is. In this guide I use the path /mnt/vmfstemp/vm1 but it will be different for you.
<root@45prox:~#> cd /mnt/vmfstemp/vm1
- Get the VM ID # assigned to the Proxmox VM you are going to map this disk to.
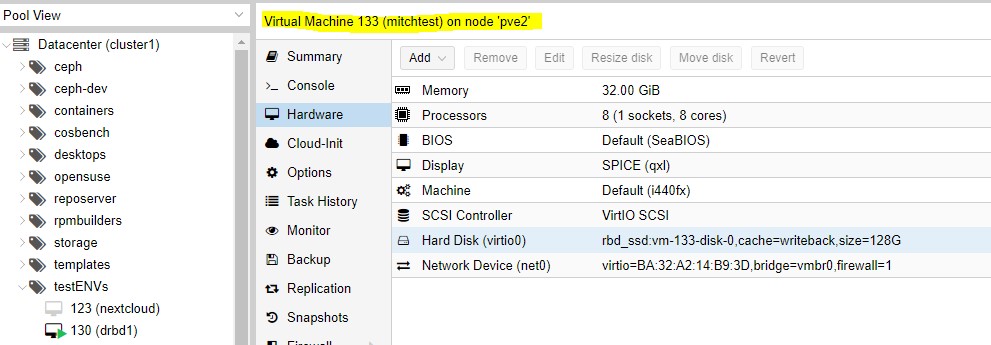
- Once you have the VM # - you will need to know what storage medium you want to migrate this VM disk to. In this Proxmox environment, we have a ZFS zpool that can hold disk images, and we also have a Ceph RBD pool mapped that can hold disk images. The command to do the migration will only slightly change depending on where you want to migrate to.
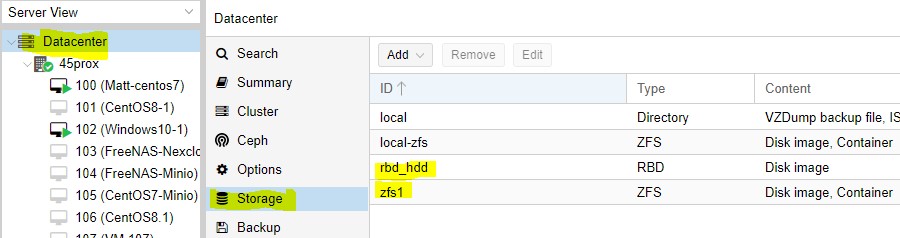
- You will use your storage ID name in the command. In my environment, the zpool is named zfs1 and the RBD pool is named rbd_hdd. This information can be found in the storage tab:
 With all of this information, you are now ready to run the command that will migrate the VMDK to your storage of choice.
<root@45prox:~#> qm importdisk 133 vm1-flat.vmdk rbd_hdd -format raw
<root@45prox:~#> qm importdisk 133 vm1-flat.vmdk zfs1 -format raw
- Once this completes, navigate to the Proxmox GUI, and click on the VM you moved the disk to. You will now see an unused disk.

- In order to add this to the VM, double-click the unused disk and select the disk type. For windows, use SCSI and VirtIO SCSI for the controller. Next, click add. The Disk can now be accessed and used in your VM on Proxmox.
Verification
Start your Windows VM, and if it is the OS disk you should see it boot into Windows, if it is a secondary disk you will want to open Disk Manager once you boot into Windows and you may have to set the disk to online and give it a disk letter.
Troubleshooting
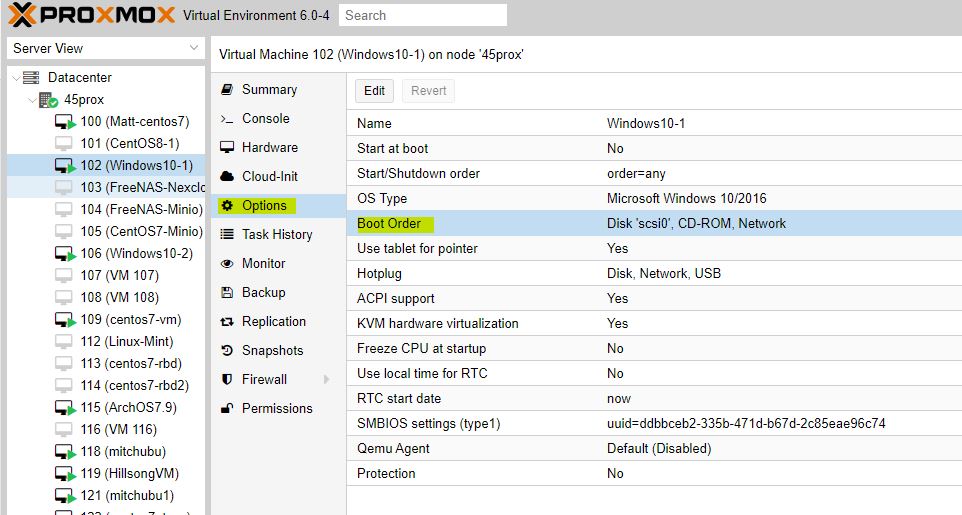
- If the VM is not picking up the disk immediately, be sure to click on the 'Options' tab of your VM, and ensure that the disk is set in the boot order of your VM. If it is not, click on boot order and add this disk into the boot order.
![]()
![]()
![]()
![]()
![]()
![]()
![]()
![]()
![]()
![]()
![]()
![]()
![]()
![]()
![]()
![]()
![]()
![]()
![]()
![]()
![]()
![]()
![]()
![]()
![]()
![]()
![]()
![]()
![]()
![]()