KB450193 - Creating Mirror Accelerated Parity Volumes And Storage Tiers in Storage Spaces (Windows Server 2019)
Posted on January 13, 2020 by Mitchell Hall

| 45Drives Knowledge Base |
KB450193 - Creating Mirror Accelerated Parity Volumes And Storage Tiers in Storage Spaces (Windows Server 2019) https://knowledgebase.45drives.com/kb/kb450193-creating-mirror-accelerated-parity-volumes-and-storage-tiers-in-storage-spaces-windows-server-2019/ |
NOTE: Anytime the < > brackets are used in the step-by-step guide, they are to be removed when inputting the command
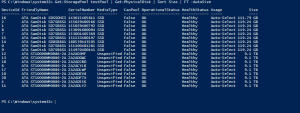
When using HBA cards, Windows may not pick up your device's storage type correctly, or at all (Windows uses the designation MediaType). If this is the case, the first step will be to set this to be the correct Media Type for your drives. To check if your drives are being picked up correctly, open the Windows Server Manager and move to Storage Pools. Click on the Primordial Pool, and view the Media Type of your Physical Disks:
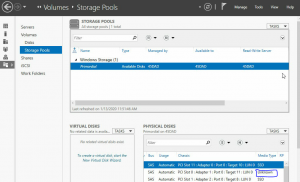 As you can see, some of the disks are not being picked up properly. Mostly it will be either the HDD's or the SSD's not being picked up properly. Other times it may be a mixture of both. This guide will show how to set the proper Media types for disks in both circumstances.
Whether your disks populated correctly or not, the next step is to create a pool with all of the disks you plan on using for your storage pool. As noted in the beginning, if you are looking to create mirror accelerated parity volumes with SSD's as the performance tier and HDD's as the capacity tier, using a disk ratio of 20% SSD to 80% HDD is recommended.
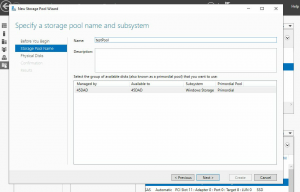
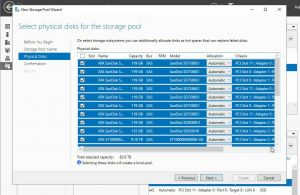
Next, right-click on your Primordial pool and select New Storage Pool. Run this wizard to name your pool, and add all of the disks you are looking to use in your storage pools. Even the ones that do not have the correct MediaType yet. Finally, click Create.
 Note: If your disks populated Media Type correctly, you can skip this next step and move directly into setting up Storage Tiers.
Next, it is time to correctly set Media Type on all drives.
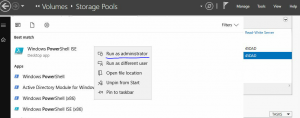
In our experience, typically only SSD's or HDD's will be unknown, not both. So for example your SSD's Media Type may be designated correctly, and your HDD's are designated as uknown or vice-versa. If this is the case, we only need to fix one Media Type. To do this open PowerShell ISE. Be sure to run as Administrator
 Once in PowerShell Type:
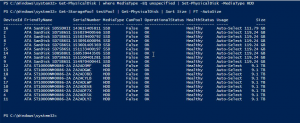
PS C:\Windows\system32> Get-StoragePool testPool | Get-PhysicalDisk | Sort Size | FT -AutoSize
This will give you an overview of all of the disks in the pool, the FriendlyName that Windows has designated for each disk, and most importantly right now, which disks are lacking the correct Media Type.
 If you want to change the Media Type designation for a specific disk you will use the FriendlyName with this command:
PS C:\Windows\system32> Set-PhysicalDisk -FriendlyName "FriendlyNameHere" -MediaType <HDD OR SSD>
OR if you are looking to set all disks with MediaType as unspecified to either HDD or SSD you can use this command:
PS C:\Windows\system32> Get-PhysicalDisk | where MediaType -EQ unspecified | Set-PhysicalDisk -MediaType <HDD OR SSD>
 Now that your storage pool can designate between HDD's and SSD's it is time to create a performance tier and a capacity tier of storage in your pool.
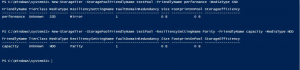
First, create a performance tier out of your SSD's with the following command:
PS C:\Windows\system32> New-StorageTier -StoragePoolFriendlyName <Name of your pool> -FriendlyName performance -MediaType SSD
Next, create a capcaity tier out of your HDD's with the following command:
PS C:\Windows\system32> New-StorageTier -StoragePoolFriendlyName <Name of your pool> -ResiliencySettingName Parity -FriendlyName capacity -MediaType HDD
 Everything is now set up and ready for you to begin creating new Volumes in your pool.
To create your first mirror accelerated parity drives, use the following command:
PS C:\Windows\system32> New-Volume -FriendlyName <name you want to give your volume> -FileSystem ReFS -StoragePoolFriendlyName <Name of your pool> -StorageTierFriendlyNames performance, capacity -StorageTierSizes <SSD size first, HDD size next : Example: 200GB, 800GB>
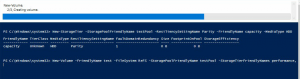 Your Volume is now complete, and ready to be mounted or shared out as needed!